![]() Partitions are initially set up during the installation
process. DiskDrake allows you, to some extent, to resize your
partitions, move them, etc. DiskDrake can also deal with
RAID devices and supports LVM but we
will not discuss these advanced uses here.
Partitions are initially set up during the installation
process. DiskDrake allows you, to some extent, to resize your
partitions, move them, etc. DiskDrake can also deal with
RAID devices and supports LVM but we
will not discuss these advanced uses here.
![[Warning]](images/warning.png) |
Warning |
|---|---|
|
DiskDrake is very powerful and can therefore be a dangerous tool. Misuse could very easily lead to data loss on your hard drive. Because of this potential loss of data, you are strongly advised to take some protective measures before using DiskDrake:
|
DiskDrake enables you to manage partitions on each physical hard drive on your machine, and also on removable drives: USB hard disks, keys, memory cards, etc. If you only have one IDE disk, you will see a single tab called hda below the file-system types. If there is more than one drive, then each drive will have its own tab and will be named according to the Linux name for that drive.
The window (see Figure 6.1, “DiskDrake's Main Window”) is divided into four zones:
Top. The structure of your hard drive. When you launch DiskDrake it will display the current structure of the drive. The display is updated as you make changes.
Left. A menu relevant to the partition currently selected in the above diagram.
Bottom. Buttons for executing general actions. See Section 1.2, “DiskDrake's action buttons”.
We will now review the actions available through the buttons at the bottom of the window, and then describe a practical use case.
Clicking on this button will clear all partitions on the current hard drive.
-
Displays a dialog allowing you to:
. Allows you to save the current partition table to a file on a disk (a floppy, for example). This may prove useful if a problem arises (such as an error made during drive repartitioning).
. Allows you to restore the partition table as previously saved with . Restoring a partition table may recover your data as long as you do not reformat partitions, because the formatting process overwrites all your data.
. If you lose your partition table and have no backup, this function scans your hard drive to try and reconstruct the partition table.
Cancels last action. Most modifications made to your partitions are not made permanent until DiskDrake warns you it will write the partition table. This button therefore allows you to undo all of your modifications on partitions up to last write.
This button allows you to access the expert mode functions (which are even more dangerous if you are not sure what you are doing). Reserved for experts.
Abstract
In this section, we are going
to do a little exercise to demonstrate one of the more useful features
of DiskDrake. Let us imagine that you decide to use your
machine as an FTP server and you want to create a separate
/var/ftp partition in order
to host the FTP files. Note that doing this step-by-step
tutorial will actually modify the structure of your hard
drive.
-
This is what the current
/homepartition looks like before modification. We are going to shrink this partition in order to create free space for the new file system.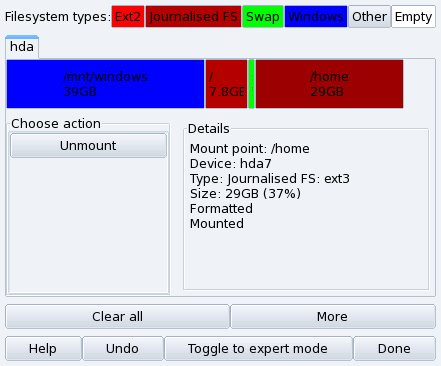
First of all, you need to unmount the
/homepartition by clicking on it and then pressing the button. -
The next step, as you may have guessed, is to click on the button. A dialog appears which allows you to choose the new size for the
/homepartition. Move the slider to reflect the new size, then click on .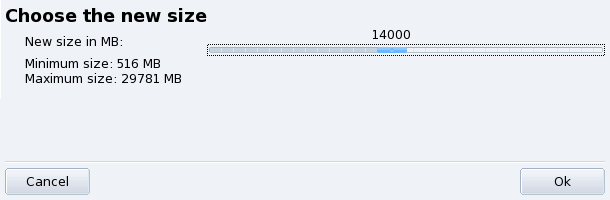
-
When this is done, you will notice that the graphic representation of your hard drive has changed. The
/homepartition is smaller, and an empty space appears on the right. Click on the empty space and then on the button which appears. A dialog will let you choose the parameters for the new partition. Set the size, choose the file system you want to use (usuallyJournalized FS: ext3) and then enter the mount point for the partition, which in our example will be/var/ftp.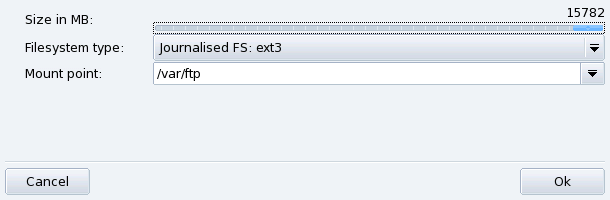
This is how our projected partition table now looks like.
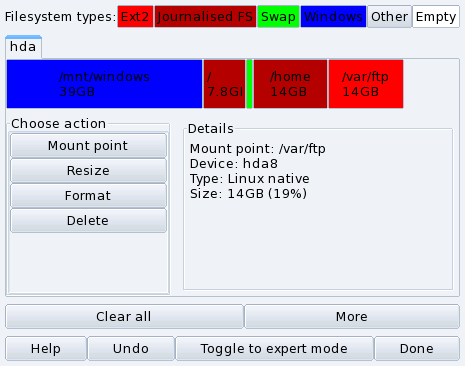
The last step is to format (prepare to host files) the newly created partition. To format the partition, click on its representation in the partitions picture, then on the button. Confirm the writing of the partition table to disk, the formatting of the partition and the update to the
/etc/fstabfile. You may be asked to reboot the computer to make changes effective.