This section describes the different functions of digiKam. We go through basic configuration, image transfer from your camera to your computer, image editing, and creating web albums.
![]() To start using digiKam, plug your camera in a
free USB slot, turn it on into “play”
mode[5], and choose
+ → from the main
menu to launch digiKam. The
1st time you do this operation, you
must provide a folder to store pictures into: you can accept
the default. If your camera is not listed in the
menu, then choose and click on
. If detection fails, click
on and look for your camera in the
list, or fill the parameters corresponding to your camera, and
accept your settings.
To start using digiKam, plug your camera in a
free USB slot, turn it on into “play”
mode[5], and choose
+ → from the main
menu to launch digiKam. The
1st time you do this operation, you
must provide a folder to store pictures into: you can accept
the default. If your camera is not listed in the
menu, then choose and click on
. If detection fails, click
on and look for your camera in the
list, or fill the parameters corresponding to your camera, and
accept your settings.
Check GPhoto2's supported cameras list for more information on camera support. If your camera uses the Picture Transfer Protocol (PTP), it may be supported even if it's not in the Gphoto2 list. You can also consult the very complete Digital Camera Support for UNIX, Linux and BSD web page.
![[Note]](images/note.png)
If your digital
camera is not recognized, you can still try to use a USB
“card reader” which lets you plug in the camera's
memory. They usually appear mounted under the
/media folder, so you can access them
as you would any other storage device. Many card readers
support multiple memory card types: Compact Flash, Secure
Digital, etc.
If you have a laptop computer with a PCMCIA slot, you can use the ATA photo memory PCMCIA card adapters. They are mounted just like any other ATA device (CD-ROM, hard disk, etc.) in order to access your pictures. This is the fastest method to access photo cards. It also means the camera's batteries could last longer.
Select the photos you want to transfer in the digiKam camera import window. New in-camera images are then marked in the upper-right border.
Choose the album to store photos into and click . Click on and enter an album name to create a new album.
-
Selected pictures are transferred to that album[6].
![[Tip]](images/tip.png)
Tip If the camera saves rotation information in the picture, then the picture is automatically rotated while transferring it. If the picture is not rotated automatically, you can still rotate it by hand, see Section 2.4.1, “Rotation”.
![[Warning]](images/warning.png)
 Select a picture and click on this button to
open the image edit window. Bear in mind that on-screen rendering
is quite different from printing your digital pictures on
photographic paper. So if you intend to both print and publish
your pictures for online viewing, it might be wise to treat both
copies differently from the beginning.
Select a picture and click on this button to
open the image edit window. Bear in mind that on-screen rendering
is quite different from printing your digital pictures on
photographic paper. So if you intend to both print and publish
your pictures for online viewing, it might be wise to treat both
copies differently from the beginning.
|
Tip |
|---|---|
Press Ctrl-Z to undo the last transformation operation. However, once you have saved the image, changes cannot be undone. |
 Simply choose one of the entries (90º, 180º or 270º) from the
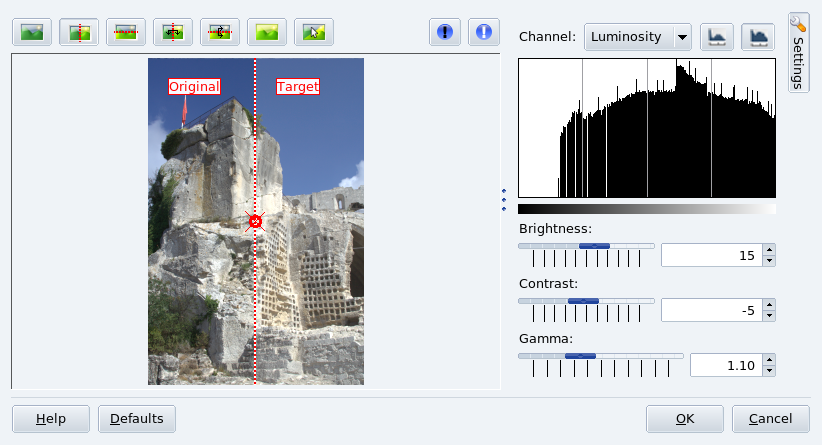
 Choose + →
from the menu and use the sliders to adjust the
brightness, contrast and gamma of the picture using the
picture copy as a guide.
Choose + →
from the menu and use the sliders to adjust the
brightness, contrast and gamma of the picture using the
picture copy as a guide.

 Choose
→ from the menu,
drag the rectangle to the part of the image to be used as a guide,
and use the slider to sharpen the picture.
Choose
→ from the menu,
drag the rectangle to the part of the image to be used as a guide,
and use the slider to sharpen the picture.

 Select the pupil of the eye to fix, choose
→ from the menu, and then
select the aggressive (only part of the eye selected) or mild
(more than the eye selected) option to reduce the red-eye flash
effect. Repeat for the other eye, if needed.
Select the pupil of the eye to fix, choose
→ from the menu, and then
select the aggressive (only part of the eye selected) or mild
(more than the eye selected) option to reduce the red-eye flash
effect. Repeat for the other eye, if needed.

 Multi-megapixel images are
excellent for photographic paper print-ups, but are far from
adequate for e-mailing or publishing on the Web. Choose
→ from the
menu, then select the desired size, either in pixels or in
percentage, and whether or not to keep (recommended) the
aspect ratio.
Multi-megapixel images are
excellent for photographic paper print-ups, but are far from
adequate for e-mailing or publishing on the Web. Choose
→ from the
menu, then select the desired size, either in pixels or in
percentage, and whether or not to keep (recommended) the
aspect ratio.

 You can also crop an image to
a desired size while keeping aspect ratio. Choose
→ from the menu, drag the rectangle to
frame the part of the image you are interested on, and select the
aspect ratio, orientation, width and height (one follows the other
according to the aspect ratio selected).
You can also crop an image to
a desired size while keeping aspect ratio. Choose
→ from the menu, drag the rectangle to
frame the part of the image you are interested on, and select the
aspect ratio, orientation, width and height (one follows the other
according to the aspect ratio selected).
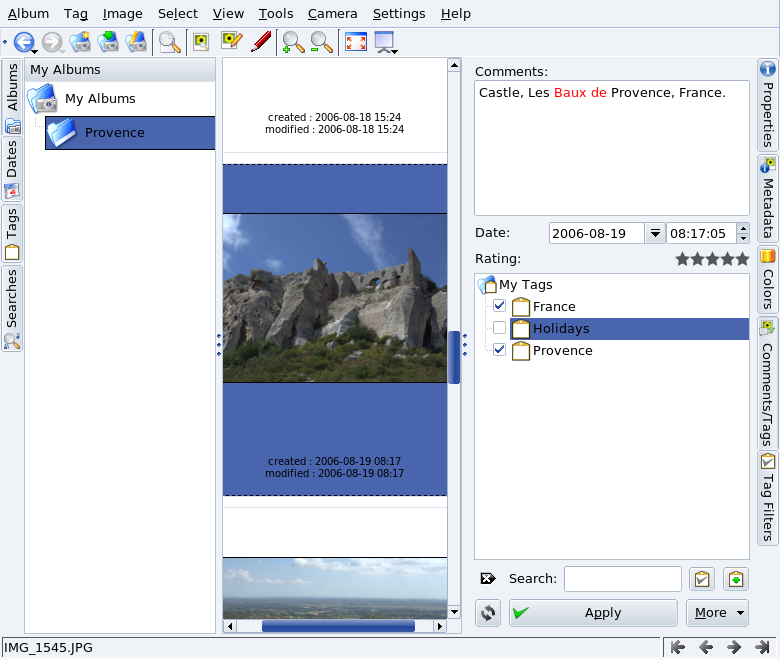
You can use the tabs located at the right of digiKam's window to view EXIF information, add comments and tags, etc.
 Most
digital cameras produce EXIF (Exchangeable
Image File Format) files. EXIF provides extra
tags containing information about the image such as the date,
camera model, exposure time, ISO speed setting,
aperture, etc. Select the picture, open the
Metadata tab, and select the
EXIF tab.
Most
digital cameras produce EXIF (Exchangeable
Image File Format) files. EXIF provides extra
tags containing information about the image such as the date,
camera model, exposure time, ISO speed setting,
aperture, etc. Select the picture, open the
Metadata tab, and select the
EXIF tab.
 To add a comment to a picture, open the
Comments/Tags tab, then enter your
Comments (see Figure 5.8, “Adding a
Comment and a Tag to a Picture”). Using the same tab you can
also add tags to your pictures, for example, to organize
them. Click on once you are
satisfied with your settings.
To add a comment to a picture, open the
Comments/Tags tab, then enter your
Comments (see Figure 5.8, “Adding a
Comment and a Tag to a Picture”). Using the same tab you can
also add tags to your pictures, for example, to organize
them. Click on once you are
satisfied with your settings.
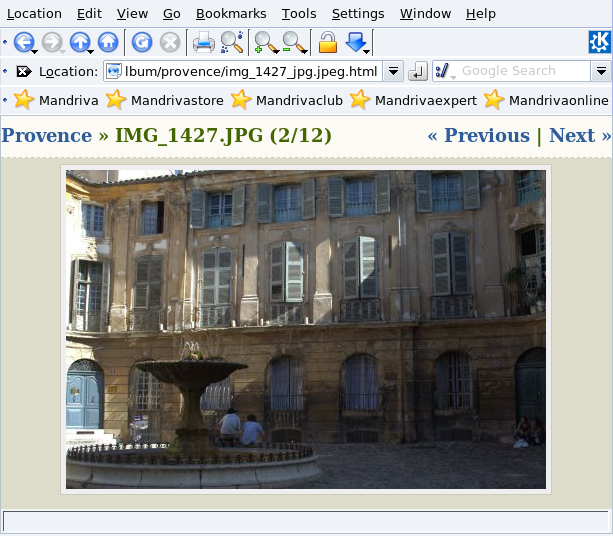
If you want to share your pictures with your family and friends, you can easily create a “Web Album” of your pictures. Choose + → from the menu, select the album options (theme, picture and thumbnails size and format, etc.), finally provide a Destination folder to store the album and click to create it: the album is then opened inside the browser for you to preview it (see Figure 5.9, “Previewing a Web Album”). You are ready to upload the album to the Web.